Flyers Online
Canada Stores & Savings
Canada Stores & Savings
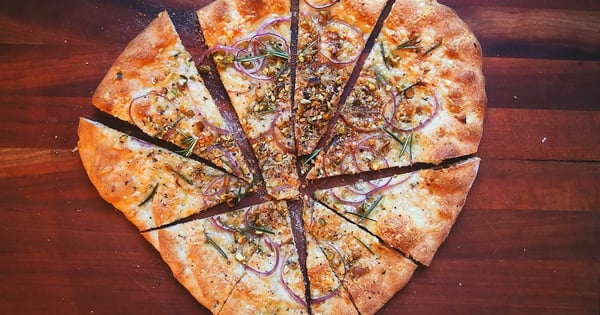
Pizza Rosa (Bianco) Recipe

Ingredients
- 1 ball Pizza Dough (recipe follows), rested and ready to shape
- 3 oz. Parmigiano-Reggiano, coarsely grated
- Scant ¼ cups paper-thin slices red onion
- Leaves from ½ rosemary sprig
- A small handful of unsalted roasted pistachios, crushed
- Extra virgin olive oil, for drizzling
- 1 envelope (2 ¼ teaspoons; 9 grams) active dry yeast
- 2 cups warm water (105 to 110 degrees F)
- 5 to 5 ½ cups bread or other high-protein flour, preferably organic and freshly milled, plus more for dusting
- 2 tsp. (12 grams) fine sea salt
- Extra virgin olive oil, for greasing the bowl
| PREP TIME 15m |
COOK TIME 30m |
TOTAL TIME 45m |
YIELD 4-6 servings |
|---|
Instructions
- Position a rack in the lower third of the oven (remove the rack above it) and place a pizza stone on it. Turn up your oven to its maximum setting and let that baby preheat for a solid hour.
- Once the oven is preheated, grab a pizza peel and give it a nice, light dusting of flour. Shape the dough as directed in the dough recipe and set the dough on the floured peel. Jerk the peel to make sure it’s not sticking. If it is, lift the dough and dust the underside with extra flour (or, if no one is looking, blow under it very gently). Tuck and shape it until it’s a happy circle.
- Scatter the Parmigiano evenly over the pizza, stopping about ¾ inch - a fat thumb’s width - from the edges. Scatter the onions and then the rosemary - pinching it to lightly bruise it and release its oils as you go - evenly over the top.
- Open the oven and, tilting the peel just slightly, give it a quick shimmy-shake to slide the pizza onto the pizza stone. After about 5 minutes, quickly scatter the pistachios over the pizza. Bake the pizza for 5 to 10 minutes longer, until the crust is crisp and golden brown.
- Remove the pizza with the peel and drizzle with a good glug of olive oil. Enjoy immediately!
- Combine the yeast and warm water in a large bowl. Give the yeast a stir to help dissolve it, and let it do its thing for 5 minutes. You’re giving it a little bit of a kick-start, giving it some room to activate, to breath.
- When the yeast has dissolved, stir in 3 cups of the flour, mixing gently until smooth. You’re letting the flour marry the yeast. Slowly add 2 cups more flour, working it in gently. You should be able to smell the yeast working - that happy yeasty smell. Add the salt. (If you add the salt earlier, it could inhibit the yeast’s growth). If necessary, add up to ½ cup more flour 1 tablespoon at a time, stirring until the dough comes away from the bowl but is still sticky.
- Turn the dough out onto a floured work surface and get to work. Slap the dough onto the counter, pulling it toward you with one hand while pushing it away with the other, stretching it and folding it back on itself. Repeat the process until the dough is noticeably easier to handle, 10 to 15 times, then knead until it’s smooth and stretchy, soft, and still a little tacky. This should take about 10 minutes, but here, feel is everything. (One of the most invaluable tools i have in my kitchen is a plastic dough scraper. It costs next to nothing, and it allows me to make sure that no piece of dough is left behind.)
- Shape the dough into a ball and put it in a lightly greased big bowl. Roll the dough around to coat it with oil, then cover the bowl with plastic wrap and let the dough rest in a warm place until it doubles in size, 3 to 5 hours. When you press the fully proofed dough with your finger, the indentation should remain.
- Turn the proofed dough out onto a floured work surface and cut it into 4 pieces. Roll the pieces into balls and dust them with flour. Cover with plastic wrap and let them rest for another hour, or until they have doubled in size.
- The dough is ready to be shaped, topped and baked. If you don’t want to make 4 pizzas at a time, the dough balls can be wrapped well and refrigerated for up to 8 hours or frozen for up to 3 weeks; thaw in the refrigerator and let come to room temperature before proceeding.
- To shape the pizza dough hold the top edge of a piece of dough with both hands, allowing the bottom edge to touch the work surface, and carefully move your hands around the edges to form a circle of dough. You have to find your own style, but I usually just cup my hand into a C shape, turn my hand knuckle side up, and drape the dough off it, allowing gravity to do its work, so it gently falls onto the floured table. Imagine you’re turning a wheel. Hold that dough alof, allowing its weight to stretch it into a rough 10-inch circle. Don’t put any pressure on it by pulling or stretching it, just let gravity do the job - you want that aeration and cragginess. Keep it moving, and it will start to relax - like we relax when we are on a sofa.
- At this point, you’re ready to make a pizza. Lay the dough on a lightly floured pizza peel or inverted baking sheet. Gently press out the edges with your fingers. You will start to see some puffiness or bubbles now. Jerk the peel to make sure the dough is not sticking. If it is, lift the dough and dust the underside with a little flour (or, if no one is looking, blow under it very gently.) Tuck and shape it until it’s a happy circle.
- Top the pizza as per the instructions in any of the recipes that follow.
A recipe from Saveur
2018-08-03
https://www.flyers-on-line.com/data/recipes/3322/pizza-rosa-bianco-.jpg
You also might like:

Printed from Flyers-Online.com


